Need training at your office? Request a quote for custom training.
Adobe FrameMaker: Adding an Image in Front of a Paragraph
by Barb Binder
This question came in yesterday from a former Advanced FrameMaker student:
I’d like to insert a graphic each time my document is going to reference a “Note.” How do you suggest I do this? Just insert the graphic each time?
That would work, but here’s what I’d do:
- Add the graphic to the Reference Page.
- View > Reference Pages.
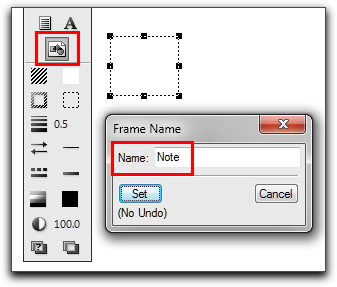
- Graphics > Tools > Place a Graphic Frame tool.
- Draw a graphic frame and give the frame the name “Note”. Click on Set.

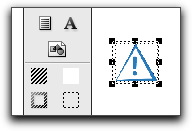
- File > Import > File to add the graphic to the frame, then size the frame to fit the graphic.

- View > Body Pages.
- Create and format a one-row, two-column table.
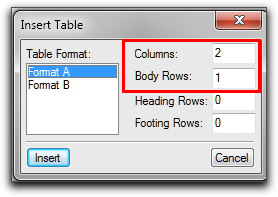
- Table > Insert Table and define two columns and one body row.

- Use Table Designer to create a Table format (I called mine “Alert Table”) and set your table up to look the way you want. In my example, I’ve hiding the table title and all of the table rules, and adjusted the column widths.

- Set up the first cell to call in the image.
- Click an insertion point in the first cell.
- Create a new paragraph format. (I called mine “Note Graphic”.)
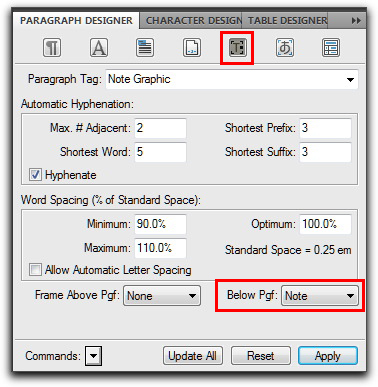
- In the Advanced properties sheet of the Paragraph Designer, set Frame Below Pfg to “Note” and Update All.

- You many need to adjust the table and paragraph spacing values to put the image exactly where you want it.

- Set up the second cell to hold the note text.
Once you have the first table set up, this gets a lot quicker. And you can also create a series of graphic images on the reference pages so that you can use the same table for any kind of alert: Static, Caution, Danger, etc…


Nice technique… But for some reason I get a fat white border (?) around my icon, which is particularly large on its righthand edge, even though I’ve sized the frame to fit the graphic… Any ideas?
I’d have to guess that the white border is a.) part of the image or b.) a stroke around the graphic frame. Since it’s thicker on one side, I’m thinking that it is part of the graphic. Take a look at the image in Photoshop (or Illustrator, depending on the type of file) and take care of it there.
~Barb
Hi Barb, it turns out it’s neither, the white space will disappear if I resize the column that contains the icon. However, I’m generating HTML using Quadralay’s “ePublisher” tool, and I’ve found that “ePublisher” can’t use the icon in the generated HTML output, which is a shame, but thanks anyway!
Jim
Will this method reduce the pdf size? The PDF i am talking about has around 500 images that needs to be placed in reference pages and later in documents.
Sheeja: Linking images will keep the FrameMaker file size down. Acrobat has it’s own various ways of reducing the size of the files, including downsampling images and setting compatibility to the more current versions.
~Barb