Need training at your office? Request a quote for custom training.
Adobe FrameMaker: Multiple References to One Table Footnote
by Barb Binder, Adobe Certified Instructor on FrameMaker
Updated Mar 07, 2021
Footnotes in FrameMaker are pretty straightforward. Place your cursor where you’d like the footnote reference to appear, and choose Insert menu > Footnote. If your cursor was in the body of the footnote, the note will appear at the bottom of the page. If your cursor was in a table, the footnote will appear directly below the last line of the table. (If you are new to footnotes, review the basics in Adobe FrameMaker: Formatting Footnotes.)
NOTE: In earlier version, the add footnote command was found in Special > Footnote. Also, while the content in the post has been updated, the screen shots still need updating—they are from the original posting in 2010 so they will not exactly match current versions of FrameMaker. If you get stuck, just let me know at the bottom of the post. I’ll give you a hand.
What do you do when one table has multiple references to a single note? I use one of two techniques:
I. Add a Cross-Reference
- Start by putting in the first footnote with Insert menu > Footnote.
- Click on the note under the table and jot down the Paragraph Format (FrameMaker defaults to TableFootnote).
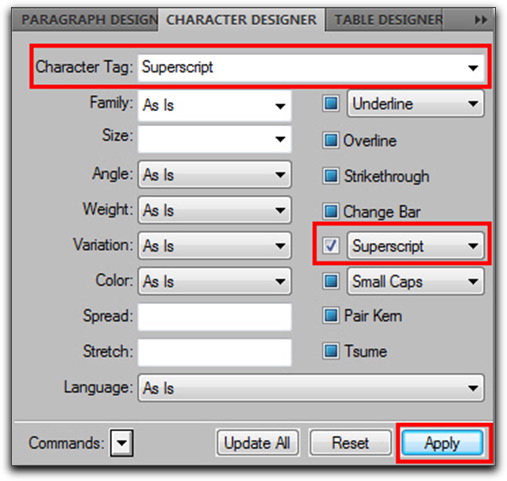
- Create a Character Tag for superscript:
- Place your cursor back in the table, where you want to place a second reference to the first footnote.
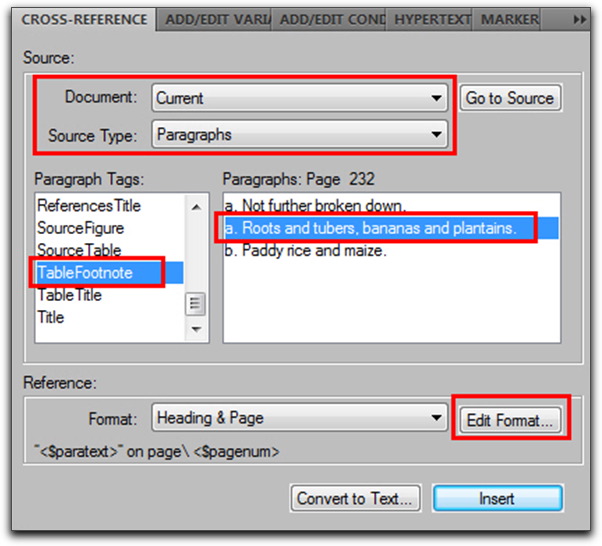
- Choose Insert menu > Cross-Reference.
- Set the Document to Current, the Source Type to Paragraphs, and the Paragraph Style to TableFootnote (or whatever Paragraph style you jotted down in step 2).

- A list of all the TableFootnotes in the document appears: scroll to find the one you want to reference, and click it.
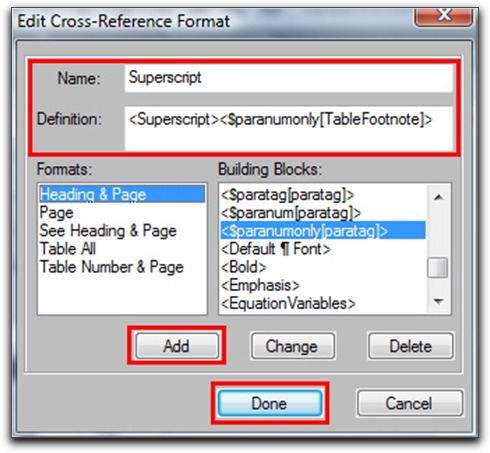
- Create a Reference format for the footnote references:
- Click the Edit Format button in the lower right corner
- Change the Name to Superscript
- Delete everything on the Definition line and replace with <Superscript><$paranumonly[TableFootnote]>

These building blocks tell FrameMaker to turn on the Superscript Character Tag you created earlier, and then they pull the paragraph number only (not the text, or any additional punctuation you may be using) of the tag called TableFootnote. You do not need to reset the formatting back to Default Para Font after the paranumonly building block—it resets itself. - Click Add, Done, OK (to losing History, if activated) and Insert.

- There you go! If you need to reference the note a third or fourth time, it’s way easier because you’ve done all the hard work.
- Click your mouse where you want the next cross-reference to go
- Insert menu > Cross Reference
- Click TableFootnote
- Click Insert
- If you end up adding or deleting the table footnotes, you’ll find that these will all update automatically when you update your references, or update your book.
II. Cheat
True confessions. When I feel fairly confident the footnotes won’t undergo edits that will force renumbering, I’ll just type in the letter of the note and superscript it. Shhhh. That’s our little secret.


Thank you, thank you, thank you, for writing this informative article. The information you provided was clear and concise and exactly what I was looking for. I spent hours on the Adobe site trying to figure out how to do exactly what your site showed me in 5 minutes, kudos to you.
I have added you to my bookmarks list and will revisit often as I see you have quite a few other articles that also look beneficial for technical writers and the like.
Best regards,
Adam Jasper
Glad it helped, Adam.
~Barb
Nice workaround; it works perfectly….Thanks 🙂