Need training at your office? Request a quote for custom training.
Adobe FrameMaker: Setting Tabs, Part II
by Barb Binder
In Adobe FrameMaker, Setting Tabs, Part I, we talked about setting tab stops. To review the key points: 1.) press the tab key once between columns, 2.) add one tab stop per tab on each line of the table, and 3.) click under the ruler to add the tab stop. In this column, I’d like to address how to modify the alignment and position of tabs.
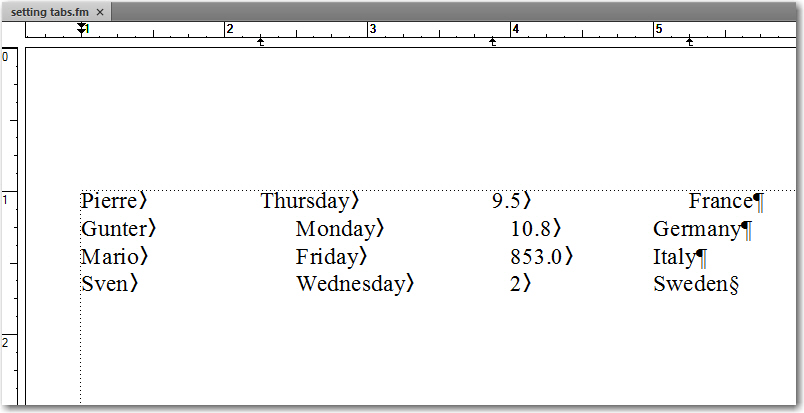
Let’s begin by either opening up the table from last week, or creating a new one that looks like this:

- Place your cursor on the first line of text.
- To move the columns, simply press and drag the little tab arrows under the ruler to the left or the right. Let’s push each of the tab arrows a bit to the right.

- Hmmm. How come only the first line is responding? Because that’s where the cursor is. Click Update All in the Paragraph Designer to update the table.

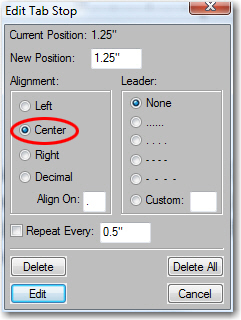
- To change the tab alignments, all you need to do is double click the little arrows, which will open the Edit Tab Stop Dialog. You can pick the new tab alignment from the list of the left.
- Double click the first tab arrow, change the alignment to center and click Edit.

- Double click the second tab arrow, change the alignment to decimal and click Edit.
- Double click the third tab arrow, change the alignment to right and click Edit.
- Click Update All in the Paragraph Designer to update all of the lines.
- Once you change alignment, you will likely have to adjust the tab positions again. Drag each tab left or right, and when you are satisfied, click Update All.
- If you end up with extra tabs on the line, you can delete a tab by dragging it up or down, out of the ruler.
- Double click the first tab arrow, change the alignment to center and click Edit.
If you remember these rules, you should be good to go:
- Click (under the ruler) to add a tab stop.
- Double click the tab arrow to edit the tab alignment.
- Drag the tab arrow left or right to adjust the column position.
- Drag the tab arrow up or down to remove a tab arrow from the ruler.
My students will often question my use of tabs in setting up a table like the one above. Why not use the table feature, they ask. I agree, why not? Controlling the presentation is more flexible using a table, but I believe that this exercise helps you to understand how tabs work in general. When you try to format a table of contents or set up form rules, this foundation is critical. See Adobe FrameMaker, Setting Tabs, Part III for setting up leader dots.


I need to set a decimal tab in a table. I have a BUNCH of numbers having some “-” and some “/” and would like to align the dashes and the slashes so that the numbers align in a certain way. I’ve tried placing the tab in the Autonumber Format and then setting up my decimal tabs but, apparently, the tab that was placed in the Autonumber Format area of the Paragraph Designer doesn’t work. I REALLY do not want to place a tab MANUALLY in every single one of these cells, WAY TOO MUCH TIME and EFFORT. Gotta be a better, easier way. Thanks much!
Actually, adding the tab character “t” to the Autonumber Format text box in the Paragraph Designer is the way to go. Chances are your tab position is off. Play with a simple table with a wide column until you figure out how to control it. You can always purchase an hour of support here: https://www.rockymountaintraining.com/class_consulting.php, but I think you’ll be ok on your own.
~Barb