Need training at your office? Request a quote for custom training.
Adobe Illustrator: Setting New Document Profile Defaults
by Barb Binder
Updated Aug 5, 2016 for CC 2015
Adobe Illustrator handles setting new document defaults very differently than InDesign & Photoshop. We set system defaults in InDesign by closing all open files, and making choices in the various menus and panels. From that point on, InDesign uses those choices as the defaults in each new document. Photoshop simply remembers the last thing you’ve done—frequently, you don’t even have to give it any thought. But Illustrator? It’s a different story.
I have certain preferences that I like to set for each new document. As long as they are choices I can make in the Preferences dialog box, then it’s no big deal, because those settings impact all future documents. But there are a other document preferences that I end up having to set up each time I start a new project. It’s not a very efficient workflow.
So what are the options? One is to create a new blank document with all of my favorite settings, save it, and then use it as the starting point for each new project. That will work, until something distracts me and I inadvertently save over the file and wipe it out.
Here’s a similar, but more elegant (and safer) solution:
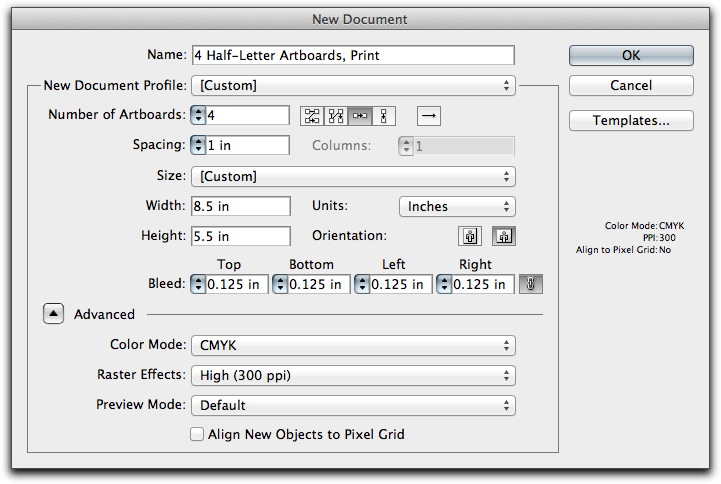
- Use File > New to create a new document. Pick the options that you want to use as a starting point for new files. In my example, I’m setting up a Print-intent document with four artboards, each 8.5 x 5.5 inches and a .125″ bleed. Note the descriptive name on the top row. Pick OK.

- Set up your favorite options. Here are some areas you might want to consider customizing:
- Swatches panel: Delete the swatches you don’t want, then add colors, color groups, patterns, and gradients. Import favorite swatches from the Swatch Libraries. Set the size of the swatch display.
- Graphic Styles panel: Delete any graphic styles you don’t want, then add or create new ones. Set the size of the graphic styles display.
- Brushes panel: Delete the brushes you don’t want, then add or create new ones. Set the size of the brush display.
- Symbols panel: Delete symbols you don’t want, then add or create new ones. Set the size of the symbol display.
- Layers panel: Add default layers, and set the size of the Layer Row Height.
- Set your view preferences (from the View menu).
- Set your print preferences (in the Print dialog box).
- If you work with charts, save your designs in Object > Graph > Design.
- Use File > Save as to save the document as a normal Illustrator in the New Document Profiles folder.
Mac OS: Hard Drive:Users:[user name]:Library:Application Support:Adobe:Adobe Illustrator CS5:[language]:New Document Profiles
Windows OS: C:\Documents and Settings\[user name]\Application Data\Adobe\Adobe Illustrator CS5 Settings\[language]\New Document Profiles
NOTE: This article was written for Illustrator CS5. In Illustrator CS6, the bold folder in the path shown above is called Adobe Illustrator CS6. For Illustrator CC, the folder is called Adobe Illustrator 17. For Illustrator CC 2015, the folder is called Adobe Illustrator 20. - Close the file.
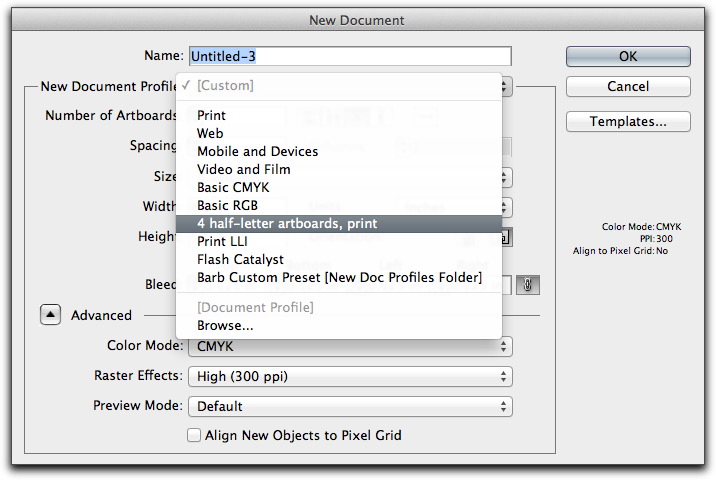
- Choose File > New and take a look at the New Document Profile list. Your file is now available, along with the other default profiles! When you select it from the profile list, it populates the New dialog box with your custom settings. Even better, when you click OK, you will see your customized panels, view and print settings.

You can use this information to create one or more custom document profiles, or edit the document profiles that ship with Illustrator.
NOTE to Mac users: No, there is not a typo on the path name in step #3. Apple decided to hide the [User]:Library folder a few years ago. The easiest way to find it? Open the Finder and Option+click on the Go menu. Pick Library from the menu, and then follow the path as shown above. If you are afraid you might forget how to find the Library again later, consider putting it in the Finder window toolbar: after you’ve opened the Library folder in the Finder, enable the Finder toolbars (View > Show Toolbar). Drag the Library folder’s icon from the Finder-window title bar and drop it onto the window’s toolbar.


After half an hour of searching for how to save color swatches to default, I finally found your blog page. Now I have done it with each new version of Illustrator but I always forget and Adobe’s instructions for it just don’t work (close all documents, select the colors you want to be default and close. You can’t select colors when you don’t have a document open). Anyway, thanks for posting this. It is a huge time saver!!!
Thank you for this post. It helped me do exactly what I wanted!
~Jaime
Note: If you can’t find the new document profiles folder in the path listed in step 3 (for windows), try looking here:
C:Program FilesAdobeAdobe Illustrator CS5Support FilesRequiredNew Document Profiles[language]
Thank you.
Note also: As of Mac OS 10.7 Lion, the Library folder under [user name] is hidden. To get access to this folder, while in the Finder click on the “Go” menu at the top of the screen. Pressing and holding the Option key will toggle viewing the Library folder in the menu.
Source: http://helpx.adobe.com/x-productkb/global/access-hidden-user-library-files.html
Oops! I just now saw the note at the end of the article describing the same hidden Library issue. I missed that the first time and had to figure it out myself. Anyway, thanks again.
I love you. I have been trying to get the swatches to appear every time I create a new doc forEVER and you just solved my problem. XOXO
Thank you SO much for posting this! I honestly couldn’t thank you enough
since loading yosemite, my illustrator cs5 app lost the tool bar and print in the file dropdown menu, fixable??
Try deleting the Preferences file (it will regenerate itself when you restart the program). In CS5, it’s called Adobe Illustrator Prefs and in 2010 (when CS5 was released) it was located in users/[username]/Library/Preferences/Adobe Illustrator CS5 Settings/en_US. Remember that on the Mac OS, the Library folder is hidden unless you hold the Opt key in Finder as you click the Go menu.
Very helpful! Thank you.
Note that if you want to add Library to the Sidebar or Toolbar areas, you must drag the actual folder icon from the top of Library folder. And conversely, to remove one, you must command-drag. (True for OS 10.8, at any rate!)
Thanks for the tutorial, it has been extremely useful to me. However, the ability save multiple layers does not work in Adobe Illustrator CC 2015 (19), and possibly earlier versions
An alternative that I have found extremely useful is to remap cmd-N to “New from Template” and put my profiles in the templates folder:
1. go to Keyboard Shortcuts » Menu Commands
2. change “New from Template” to cmd-N
3. click “Yes” to overwrite preferences
4. Put your templates in:
[Application Folder]/Cool Extras/en_US/Templates
Then, each time you create a new document you’ll have all your layers and any pre-existing content. As a bonus, it’s easier to navigate to the Templates folder than the profiles folder.
Thank you so much. A lot of repeated working time saved.
This helped me so much, thank you!