Need training at your office? Request a quote for custom training.
Adobe InDesign: Adding Arrowheads to Strokes
by Barb Binder, Adobe Certified Instructor on InDesign
I was teaching InDesign yesterday to two delightful women in Denver. We were wrapping up our day-long session when one of them asked me about creating arrowheads on the ends of their lines (aka “strokes”). Initially, I drew a blank. One of the interesting side effects of teaching lots of programs is that sometimes the answer in a different program pops up in my head and refuses to get out of the way to make room for the answer in the right program. Arrows in Photoshop? Got it! Arrows in Illustrator? Got it! Arrows in InDesign? I had nothing.
Another interesting side effect of teaching lots of programs is that sometimes the right answer in one application is the right answer in another. I held a rapid, silent conversation with myself:
Me: “Well, where are the arrows in Illustrator? Didn’t they move to the Stroke panel in CS5?”
Me: “Hey! InDesign has a Stroke panel. Does it have arrows?”
Me: “IDK. Quick, go take a look…Yay!”
Phew! I passed for knowledgeable, when in fact, I may have just gotten lucky. Or not. I had already shared my feelings earlier that morning about how fabulous it is that the primary Creative Suite applications do so many things the same way. This little episode was great way to illustrate that to my students, who plan on continuing their Adobe education on the Creative Suite apps.
Anyhow, if you want arrows in InDesign, it’s pretty darn easy once you remember where the command is:
- Select the Line tool.
- Press down your left mouse button and drag out a line. (Hold the Shift key to constrain the line to 45-degree angles.)
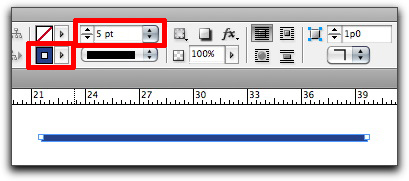
- Choose a stroke color and line height from the Control panel, if desired.

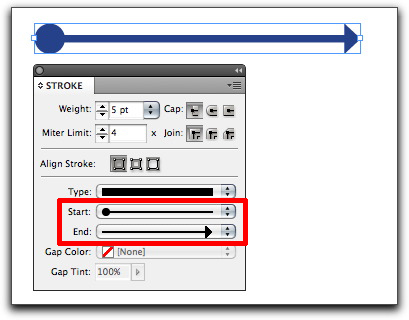
- Choose Window > Stroke to open the Stroke panel.

- Change the Start and End points to arrows or tails.
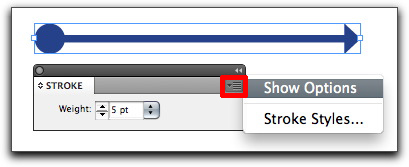
NOTE: Your Stroke panel may not show the arrowheads automatically. If you don’t see them, just pick Show Options from the Stroke panel menu.

Have fun!


Brilliant!!! and it’s been there all the time… but only now had I finally got frustrated enough to hunt for a solution to getting rid of square-text-lines and here it is… thank-you
Very detailed instructions and easy to follow. Solved my problem! Thanks!
Thanks for this, was scratching my head trying to figure out where they’d put the darn things – you’re the #1 search result for “arrow heads in InDesign”, by the way!
Thank You so much. This makes my Technical Manuals look professional.
Thanks, you solved my problem after a lot of frustrated time trying to figure it out.
Wow, one of the most helpful InDesign tips I have learned! Thanks.
Thank you SO MUCH for making it so simple! Adobe’s site was of NO help!
Thank you for sharing this! I work in inDesign a lot, but I’m not a graphic designer, so I’m glad I didn’t have to bother our designers for an answer. This explanation was easy enough for a novice like me to follow.
Thanks!
Quick and easy. Thank you!
This was so helpful! I figured there must be a way, but had no idea where to even start.
Thank you!
Super helpful! Thank you so much.
Thanks for the help. Now, can you change the size of the arrow head apart from the line weight, like in Illustrator?
Yes, Doug. InDesign has the same arrowhead interface as Illustrator. In both applications, the arrowhead Scale menus appear directly below the Start/End arrowhead menus.
~Barb