Need training at your office? Request a quote for custom training.
Adobe InDesign: Drop a Photo into a Paragraph
by Barb Binder
We’ve come along way from the limited inline graphic controls of the PageMaker/early InDesign days. With the advent of anchored objects in InDesign, our positioning controls of images that need to travel with the text they modify have greatly increased. But so has the complication factor. If any of you immediately understood every option in the Custom Anchored Object Options dialog box the first time you opened it up, I’d like to hear from you. I’m not saying we can’t work through it and figure out what all the controls do, I’m just saying it takes some effort.

One of my recent InDesign students needed to drop headshots into biographical paragraphs, and ensure that they moved with the text during edits. She was understandably baffled by the custom options shown above. Luckily for her, the answer was significantly simpler. Here’s what she did:
- Place an insertion point (the blinking text cursor) at the beginning of the first bio.

- Choose File > Place to import the first image. The image appears at the beginning of the paragraph as an inline graphic.

- Make sure the image frame is selected (sizing handles visible around the frame edge), and choose Window > Text Wrap.
- Turn on Wrap around Bounding Box (button #2 on the top row) and then add a bottom and right offset.

- With the frame still selected, choose Object > Anchored Frame > Options. Set the Position to Inline or Above Line, and adjust the Y Offset (you’ll need a negative value) so that the text moves up next to the picture. Pick OK and voila!

Want to be really clever? Take a moment to save the frame settings as an Object Style. Then all you have to do is assign the style to the other headshots in the document.
- Select the frame one more time.
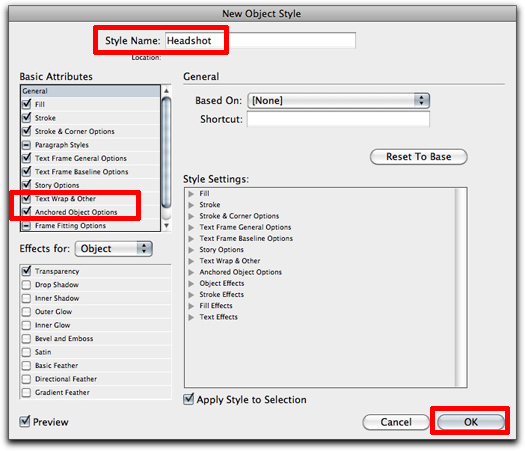
- Choose Window > Object Styles and choose New Object Style from the Object Styles panel pop-up menu.

- Type in a short, descriptive name like Headshots or Headshot Frames. Because you had the frame selected as you created the new style, the style automatically picks up the Text Wrap and Anchored Frame settings. Now you can just assign the style to the rest of the headshots and you are done!


Thanks for the great explanation.
I have a graphic I want to anchor on the right side of a paragraph (instead of the left as you show it), and also have text wrap. Is that possible?
Very helpful, thank you!