Need training at your office? Request a quote for custom training.
Adobe InDesign: Setting (and Removing) Defaults
by Barb Binder, Adobe Certified Instructor on InDesign
Updated on Aug 29, 2023
In my opinion, your software works for you, and the running theme in my training classes is how to automate your workflow so that your layout comes together quickly and leaves nights and weekends for fun, and not trying to meet your deadline. InDesign offers you many ways to automate, but the first thing I suggest you do is set up your defaults. InDesign defaults come in two flavors: system defaults and publication defaults.
System Defaults
System defaults are used by all future documents. If you find yourself always changing the typeface for each new document, or always having to add your corporate colors to each new document, then it’s time to stop and change your system defaults. Here’s how:
- Open InDesign.
- Close all open documents.
- Double check that all documents are closed by looking at the bottom of the Window menu. If any files are listed at the bottom, you have minimized but not closed them. You must close all files before continuing.
- With all documents closed, you may be surprised that you can still access various menu commands and panel menu commands. Here’s why: anything you choose now will permanently change how InDesign works from this point out. For example, if you add or delete colors in the Swatches panel right now, you will change the displayed colors in the Swatches panel in all new documents. (System defaults never change existing documents, on your future documents.)
- Take some time to look at what’s available and pick your favorite settings. What a timesaver!
Document Defaults
Document defaults are used within a single file. For new users, the immediate need is how to remove inadvertent document defaults, for advanced users, it’s how to set them up on purpose. To set (or reset) document defaults:
- Open up an InDesign document.
- Click the Selection Tool in the Toolbox (the black arrow).
- Click on an empty part of the page or better still, choose Edit > Deselect All.
- Without any objects selected, take a look at the various menus and panel menus. Any choices you make in the menus without an object selected will change the defaults for this one file.
- Take some time to look at what’s available and pick your favorite settings, or remove a setting that you activate inadvertently.
Remember though, that by definition, document defaults only affect this one document. All future new documents will rely on your system defaults. If the setting you turn off in one document is still impacting new documents, you will need to close all files, and disable the setting at the system level (see the section directly above this one.)
Resetting Defaults
With the information above, you now have the skills to manually reset system and document defaults to the choices that work best for you. To remove an individual default, simply reverse the process.
Sometimes, though, you just want to start over with the system defaults that InDesign ships with. For example, I usually have my students reset their defaults before class, so that I know exactly what their settings are and can keep the troubleshooting time to a minimum. Here’s how:
- Save and close all InDesign documents.
- Close InDesign.
- This is the hard part:
- Windows: set up the fingers on one hand to hover over Control and Shift and Alt.
- Mac: set up the fingers on one hand to hover over Command and Control and Shift and Option.
- Use the mouse to double click the InDesign icon and then IMMEDIATELY press down on keys listed above.
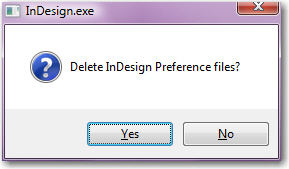
- You can let go of the mouse, but keep the keys down until you get this message:

- Click Yes and InDesign will reopen using the original system defaults. Don’t worry about deleting the Preferences file. InDesign will recreate it the next time you exit the program.

thanks for guiding us through these simple steps.. its funny how you can get used to doing something over and over again, when if you just take a little time to learn, then is usually a more efficient way to do things. Thanks for posting
Thank you for the clear tutorial — much appreciated!
Just read this and realized I have spent loads of time resetting typeface and colors when I should have simply set up the system defaults correctly in the first place. That’s habit – did not even think about it. Thanks for the post and detailed instructions.
Thank you so much,
Thanks so much. It’s useful for me.
In the old Freehand, if you were working in a document and you changed a typeface, font size or your last colour fill or line width etc, the tools would always default to that last used setting for the next time you used it.
If I remember there was a setting in the preferences to switch this feature on or off.
Is there a way to set this preference in in-design.
As per this post: to set defaults in InDesign, change your settings with nothing selected.
~Barb
I have been playing around with indesign and now cannot get rid of some attributes. I found your site about resetting everything. I want to start afresh. I tried your method of Shift/Control/Command and the box asking if I want to delete Indesign Preference files does not come up. I have a Macbook Pro running on El Capitan 10.11.6 Indesign CS3 version 5.0.4. Help!
It’s a timing issue. You need to press those keys down as soon as you start InDesign, and hold them until the message appears. If it doesn’t work, shut down InDesign and try again. It usually takes my students a few tries to get the timing down.
~Barb