Need training at your office? Request a quote for custom training.
Adobe InDesign: Why Do my Images Look So Bad?
by Barb Binder, Adobe Certified Instructor on InDesign
No one wants to see a low-resolution, pixelated image in their InDesign layout, but it happens all the time. There are three primary reasons why:
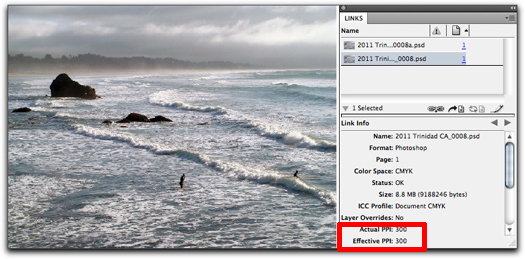
- You placed a low-resolution file into your layout. Remember the rule of thumb for color or grayscale images that are intended for print on large commercial printers: scan at a resolution of 1.5 to 2 times the screen frequency used by the printer. For example, if your output device uses a screen frequency of 133 lpi (lines per inch), then your image should be between 200 and 266 ppi (pixels per inch). You can view the resolution of your placed file by selecting its name in the Links panel and checking the resolution settings:

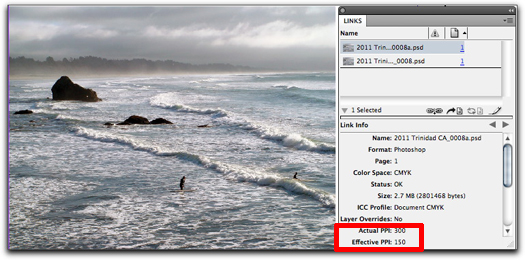
Adobe InDesign: Viewing the Actual Resolution of an image in the Links panel - You placed a file with appropriate resolution into your layout, and then enlarged it, effectively lowering the resolution. You can see when this happens in the Links panel, as well. At the original size, the image below was 300 ppi. When I doubled the image size in InDesign, I lowered the effective resolution to 150 ppi.

Adobe InDesign: Viewing the Effective Resolution of an image in the LInks panel - You did everything right and it still looks pixelated. If you have checked the image resolution in the Links panel, and have the appropriate Actual & Effective resolution for your output device, then it’s most likely simple a matter of customizing the display settings. Choose View > Display Performance > High Quality Display. It will take InDesign a few seconds longer to display your page, but the result should look significantly better! (If you need more details on Display Performance contols, see Adobe InDesign: Display Performance Controls—They’re Everywhere!)

Adobe InDesign: View > Display Performance > High Quality Display


thank you so much! I’ve been working on a media studies project and as I was working my images would always look pixelated and it was worrying!
Your clear instructions are really good as well! 🙂
Very clear & straight forward instructions, Thank you !
thank you!
Thank you so much! Very helpful.
Thanks!
One quick question: Will the printed result be the same as the high quality display?
Yes, you are adjusting the display settings on the monitor. Your choice has no impact on the printing.
~Barb
thanks so much, that was very helpful!
OR: You are missing image files in the location you have your InDesign file. I was having this problem where some images printed pixelated and others didn’t. When I realized all the blurry pictures were on my flash drive (not plugged into the computer) I was able to fix them. Just make sure you have all your images saved in the same folder/device as your InDesign file before you export it to PDF and you should be fine!
Good point, Emily!
When you link files in an InDesign document and then InDesign loses access to the original, high-res files, it will print the low-res placeholder. For more information on linked files, see “Adobe InDesign: Should You Link or Embed Your Images?”
~Barb
I was experiencing the same issue but it also had to do with how I was exporting my files to recipients. If you’re sharing a file back and forth with someone and using an interactive PDF, that’s why the image quality is being compromised! Try switching it to a print PDF and they’re back to being crisp images, as long as you’ve followed the previous steps for making sure your images are as clean as could be.
Very good!! I’ve read a lot of documents and I still had my images pixelated. Your explanation is very well achieved! Thank you*
I had this exact problem. I was placing images into a book design, all were high quality display and 300 dpi but still pixelated when zoomed in even slightly, and of course when printed too.
I realised that after saving my document but then changing the location of all my images when I came to re-open my Indesign file there was a warning saying that I had missing links. Once I re-linked everything quite simply (by clicking the alert in the links tab and choosing the new destination) everything was fine. Ensure your links are all running smoothly!
Thanks so much… You are a life saver. I was playing around with my image qualities for about an hour before finding your article. I had everything correct except for my display 🙁
Well Done… Problem solved!!!
Thank you so much for the info. Just what I was looking for. Will keep your site bookmarked now.
Thanks so much, you saved me ! Extremely helpful
you’re a life saver! thanks so much for your advice.
thank you so much, i was in a big trouble !
Thank you, thank you, thank you! I could not figure this out. Setting to “high quality display” resolved my problem.
Thank you, thank you! 😀
Or you’ve moved your original images, so the links are broken and it shows a pixelated version, relinking will correct it, if that is indeed the issue.
Thank you a lot!
I am new to Indesign and I knew there must have been something wrong with the display performance, just didn’t know where to find it 😀
Thanks!!!
The view/display solution was so simple! Thanks a million!
I had to rework certain parts of a project and you saved me from the time consuming and so usual “ho well, they must have used low-res graphics, let’s redo the whole thing”
Thanks again!
THANK YOU! I’ve been trying all sorts to get my image problem sorted and you solved it straight away!
LIFE SAVER!
Thank you so much! I was “doing everything right” like you said in option 3 and it was still looking blurry. Choosing “high quality display” fixed it. Thank you again!
Thank you so much! Third option made a massive difference! 🙂
Thank you so much for your clear a& concise advice!!! The pixelated image was just a matter of adjusting the Display Performance to High Quality Display. I was like ‘here I am placing this SUPER high resolution image, and it still shows pixelated …. ?!?!’.
so helpful! mine was the last so I was frustrated as im familiar with all the settings just had to change the view settings 🙂
Thanks so much for the tips! Very helpful!
Thank you! Your explanation was exactly what I needed!
Thank you so much. This has made a massive difference in terms of quality when I export my document into a PDF or print it directly from the InDesign document.
Thank you so much! So glad to find this post! Saved my friend’s project and always grateful for solutions in times of emergency!
Perfect! Thank you! I thought I was going crazy!!!
the third step works very well. thank you.
Thankssss boyyy!!
Thanks for the article, this had frustrated me for ages! Ended up tracing all the images in InDesign to insert them as .ai ‘images’ as that’s the only way I could keep the quality.
Thanks a lot.very useful
Thank you! This was very helpful! 🙂
Thanks, it was really helpful!
I was on deadline to finish my media project but man God Bless you, everything has worked on two clicks. Thank you
Hi this article was helpful to see how you can change the display. I am still having difficulties on my PC. I opened my logo that I created in photoshop and put it into the library cc and opened it up in Indesign. When doing so, I just get the gray box, after reading this I am finally able to get it to show up but it is still extremely grainy. The concern is, is that if I open it up on a friends mac computer and do the exact same steps it is crystal clear. I need to be able to work on my computer but I need the image to be clear. Can someone please help me understand why mine is not, and help me fix this?
Thank you so much,
Michaela Gensler
Hi Michaela:
Macs often have retina displays—and InDesign can see that—so it increases the display performance accordingly. Try View > Display Performance > High Quality Display on your Windows workstation. For more information on this command, see https://www.rockymountaintraining.com/adobe-indesign-display-performance-controls-theyre-everywhere/.
~Barb