Need training at your office? Request a quote for custom training.
Adobe InDesign: Ten Preferences That Deserve a Second Look
by Barb Binder
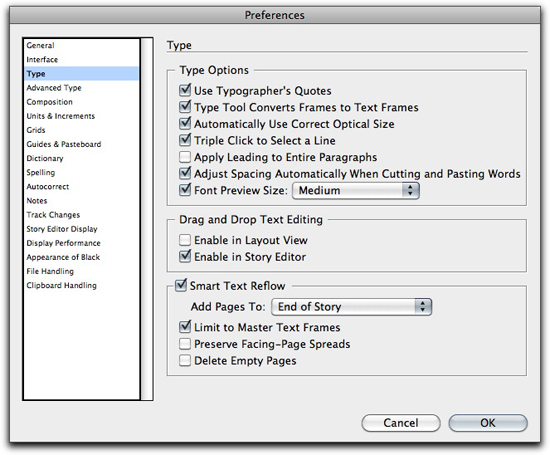
InDesign ships with default behaviors. Most of us will hunt down and change the ones that really bug us. This list represents some defaults that are mildly annoying. Still, take a look, maybe changing just one of them will brighten up your day. Mac users: start by choosing InDesign > Preferences; Windows users: Edit > Preferences. The category list is at the left, the settings within each category is on the right.
- Type > Triple click to Select a Line Did you know that if you click once on a word you will place an insertion point, two clicks will select the word, three times selects the line, four times to select the paragraph and five times to select the entire story? Cool but, how often do you want to select a line? Consider deactivating Triple Click to Select a line. Then a triple click will select the paragraph, and a quadruple click will select the entire story.
- Type > Apply Leading to Entire Paragraph Do you sometimes see uneven leading (aka line spacing) within paragraphs that you pasted in from Word? Turn this one on to always have consistent leading throughout an entire paragraph.
- Type > Font Preview Size: Large Not a fan of aging, but it sure beats the alternative. I set my font preview size to large for obvious reasons! (See the results by choosing Type > Font.)
- Type > Drag & Drop Text Editing > Enable in Layout View Word users love to use drag and drop as a way of moving text in a document. Unfortunately for them, InDesign defaults to having it off in Layout view. Consider turning it on if you are a drag and drop aficionado.
- Advanced Type > Superscript Size & Position Call me a control freak if you must, but I always want a slightly smaller, slightly higher superscript position for my footnote numbers. Change it here!
- Guides & Pasteboard > Color For my red/green colorblind buddies, this is a mandatory stop in your trip through Preferences. Change the guides to colors you can actually see! (For more details, see “Adobe InDesign: Customizing Guide Colors“.)
- Autocorrect > Enable Autocorrect Sure you can turn Autocorrect on and off through Edit > Spelling > Autocorrect, but not the first time. Turn it on through Preferences and InDesign with populate the misspellings/corrections box for you. Too late? Just open up Preferences > Autocorrect and turn Enable Autocorrect off and right back on again. Now InDesign will automatically correct misspellings, as you type.
- Story Editor Display > Text Display Options Some like Story Editor, some hate it. I like it, but need to increase my type size, considerably. See #3 if you have forgotten why. (For more information on Story Editor, see “Adobe InDesign: Using Story Editor“.)
- Display Performance > Greek Type Below I remember when I thought my 8086 processor was fast. Back then I would have to wait while PageMaker saved my edits to a floppy disk as it turned to the next page. Back then, greeking was a necessity. These days, any computer fast enough to run the current versions of InDesign really doesn’t need greeking on. Set it to 0 pts to eliminate the gray lines that represent small text. (For more information on Display Performance, see “Adobe InDesign: Display Performance Controls—They’re Everywhere!“
- File > Handling > Number of Recent Items to Display Are you a busy little bee, working on multiple projects on any given day? If you are like me, you may occasionally forget where you saved a file. Increase the number of recent items in the quick list and you’ll easily be able to find them. See the results by choosing File > Open Recent.

One thought on “Adobe InDesign: Ten Preferences That Deserve a Second Look”